Så här skapar eller redigerar du frågor
En bra undersökning har precisa frågor som gör det möjligt för mottagarna att svara exakt och korrekt. Den är så fri som möjligt för att ge dig en inblick i mottagarnas synpunkter, och den är så strikt som nödvändigt för att du ska kunna använda den för rapporter och statistik.
Anteckning:
Om du har skapat undersökningen på flera språk måste du översätta den till alla dessa språk innan du publicerar den.
Tips!
Om du vill överpröva eller redigera en fråga klickar du först på temanamnet och sedan på frågenamnet.
Så här skapar du frågor
-
Gå till Undersökningar. Hitta den undersökning du vill redigera i listan eller skapa en ny via + Lägg till.
-
Bläddra ner till Fråge-avsnittet.
-
Bredvid temat finns en
 -meny. Klicka på + Fråga.
Tips! Om temat inte finns måste du först skapa det via +Tema. -
Ange frågan och lägg till, om du vill, en förklarande text som kommer att visas under frågan.
-
Under Frågetyp kan du nu ange vilken typ av svar du förväntar dig. Läs mer här.
Om det gäller envals- eller flervalsfrågor måste du också ange svaren. Klicka på + Lägg till för varje nytt svar. -
Vill du tvinga mottagarna att svara på den här frågan? Kryssa i Ja under Obligatorisk fråga.
-
Om mottagarna ska kunna lägga till en extra kommentar för att t.ex. förklara ett datum, kryssa i Ja under Möjlighet till kommentar
-
Ange om mottagarna ska kunna ladda upp en eller flera filbilagor.
- Klicka på OK.
![]() Frågan är nu skapad.
Frågan är nu skapad.
Tips!
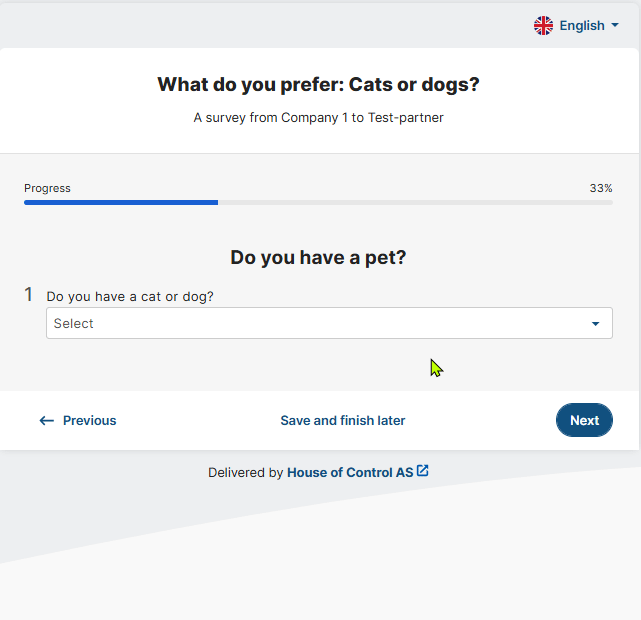
Du kan kontrollera hur enkäten kommer att se ut för dina mottagare: Öppna enkätkortet i visningsläge och klicka på Förhandsvisning.
How to create questions with branching
Denna text ger en snabb introduktion till funktionerna i en BETA-version. Funktionerna beskrivs så som de ser ut för närvarande. Det kan genomföras ändringar tills den slutliga versionen lanseras.
Branching allows you to customize what happens next based on a respondent's answer. For example, imagine you're creating an onboarding survey and want to know how users heard about your company. If someone selects "Social Media," you could branch to a follow-up question: "Which platform do you use most?" If they choose "Search Engine," you could ask: "What were you searching for?". To the right, you'll find a video tutorial, and below, you can see how branching appears to recipients.
Note!
You can only branch from single-choice questions—where respondents must select one pre-defined answer.
-
Perform the first 5 steps form the description above. Note to pick a "Simple-choice" question type.
-
Click
 Add branching.
 - You can now - for each possible answer- define what shall happen next:
The Next question shall be displayed
The Next topic shall be displayed
A specific topic shall be displayed. This would allow you to e.g. hop directly to a topic at the end of the survey (here it's necessary that you have added these topics beforehand).
The survey shall end and be submitted to the sender.
-
Add branching for all choices (not just one that branches to a specific question/topic). For choices that shall open the next question as usual, select “Next question.”
![]() Branching is now added for these questions. Continue in the same way for any other question you want to branch.
Branching is now added for these questions. Continue in the same way for any other question you want to branch.
Tip!
As branching can be quite complicated, we recommend testing it in the Preview before sending the survey. The preview is displayed in view mode.

How to remove branching
Denna text ger en snabb introduktion till funktionerna i en BETA-version. Funktionerna beskrivs så som de ser ut för närvarande. Det kan genomföras ändringar tills den slutliga versionen lanseras.
You can only remove branching from unpublished surveys:
-
Open the survey in editing mode.
-
Scroll down to the Questions section and open the topic the question where you want to remove the branching. You do so by clicking the topic name.
-
Click the question name and scroll down to the Choice alternatives.
-
Click
Remove branching. Note that this removes branching for all choices.
![]() All branching for this questions are removed.
All branching for this questions are removed.