How to import contracts and payment schedules
You can bulk import contracts and payment schedules from Microsoft Excel.
-
Finally, import the import file using a wizard. If the system finds errors, the errors are displayed and you can correct them. Read How to importNote: Mandatory fields and structure must be in place. See the description above. Ensure that the language in Complete Control is the same as the one on your export template. Go to Contracts - Import. The import wizard opens.Add the prepared Excel file you want to import. Click Next.The file will be evaluated. If no errors were found, continue with step 5.If you get the message Contract with validation errors, errors were found. They must be corrected before the related contracts can be imported: Click Download to fix errors. An Excel ark with the contracts that must be corrected will be downloaded.Note! Only the first found error per row in the Excel file is displayed in the wizard's error message table. But there can be more errors per row. So, please do a proper reevaluation of these contracts to ensure they won't fail again.Click Import (for contracts without errors). If the import takes long time, you can click Run in background and continue working with other tasks.You will get an confirmation after the successful import. Click Close.You can now find the contracts in the contract list. Payment schedules and adjustments can be found on the related contract..
Tip!
Watch the video for a demo of the process. Note that you now start the import wizard immediately by clicking Contracts - Import (the video states something different).

Step 1: Export the template
-
Start by exporting some contracts from Complete Control (via
 Contracts -
  Export).
 -
Tip!
If you have multiple “companies,” also select the correct database in the main menu.
If you only want to export selected entries, first perform a search to find the content you want to retrieve. Or select contracts manually by ticking their checkbox and then clicking Show only selected.
Do you have multiple contract templates in the database? Select contracts for export that have the same template as the contracts you want to import. Add for this the Template column for a better overview (from - Adjust columns).
 -
Select
Export in the left-hand menu.
![]() The template with the selected contracts is being exported with all fields and the required structure.
The template with the selected contracts is being exported with all fields and the required structure.
Step 2: Adjust the template to your needs
-
Open the exported file from Step 1 (you'll find it in your Download folder). You will use this file as a "template": It contains all fields and the required structure.
-
Give it a new name and start with the adjustments.
Note!
Do not change the structure (do not add new columns, change column headers or remove columns). Just add new content to the fields - and then re-import the same file. -
Adjust the Fields:
-
Red fields are mandatory fields. This means that you usually have to take a position on them (there are exceptions).
-
Black fields are always optional information.
-
List fields: There are probably a number of list fields in Complete Control. These are indicated by an arrow to the far right when you click in the Excel cell. Click the arrow to view and select values. The values themselves can be found on the last sheet of this file.
Note: It is important that you are precise here and that no typing errors creep in. Therefore, it is always best to select from the list and not to type manually.
-
-
Adjust the Structure:
-
In the Excel file, you will find one sheet for Contracts, one for DORA, one for Payment schedules and one for Scheduled adjustments. In addition, there is a sheet containing the system registers (responsible employees, categories, etc.).
-
To link a contract with its payment schedules and scheduled adjustments, you need to map their TEMP ID's (some intermediate ID's for this import):
Example: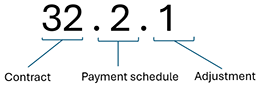
Your contract "Contract A" has TEMP ID 32 (you can choose this number freely).
The contract has two payment schedules: These start with the contract's TEMP ID 32 plus a serial number (1,2,3...): The payment schedules thus have the TEMP ID 32.1 and 32.2.
In addition, there is one adjustment on payment schedule no. 2. By following the same logic as for payment schedules, the adjustment thus gets TEMP ID 32.2.1.
Link contracts, payment schedules and adjustments by following this scheme. -
New contracts, payment schedules and adjustments must not have an ID.
If they are already in Complete Control, they must have the same ID as there (the ID is included in the export file; so don't change it during your adjustments). -
Note!
Are you going to import IFRS contracts? Then you must perform a reassessment! To perform a reassessment, select (on the Contracts sheet) "Yes" under Add reassessment and enter the date under Reassessment date. You can also add an explanatory Reassessment comment. The reassessment is done together with the import.
![]() Prepare contracts, payment schedules and adjustments by following this scheme. Once this is done, the import file is fully prepared.
Prepare contracts, payment schedules and adjustments by following this scheme. Once this is done, the import file is fully prepared.
How to import
Note:
Mandatory fields and structure must be in place. See the description above.
Ensure that the language in Complete Control is the same as the one on your export template.
-
Go to
Contracts -  Import. The import wizard opens.
 -
Add the prepared Excel file you want to import. Click Next.
-
The file will be evaluated. If no errors were found, continue with step 5.
-
If you get the message Contract with validation errors, errors were found. They must be corrected before the related contracts can be imported: Click Download to fix errors. An Excel ark with the contracts that must be corrected will be downloaded.
Note! Only the first found error per row in the Excel file is displayed in the wizard's error message table. But there can be more errors per row. So, please do a proper reevaluation of these contracts to ensure they won't fail again. -
Click Import (for contracts without errors). If the import takes long time, you can click Run in background and continue working with other tasks.
- You will get an confirmation after the successful import. Click Close.
![]() You can now find the contracts in the contract list. Payment schedules and adjustments can be found on the related contract.
You can now find the contracts in the contract list. Payment schedules and adjustments can be found on the related contract.